The “Tool Up” mission in Teardown is one of the most satisfying heists to pull off once you get the hang of it — and arguably one of the most fun due to its open-ended nature and reliance on creative problem-solving. With four main targets and four secondary objectives, your job is to get them all in under a minute. Thankfully, there’s a smart route and a few tricks to keep the chaos under control.
1. Initial Setup – Clear Your Escape Route
Start by taking control of the speedboat — this will be your getaway vehicle at the end. Drop it off at the intended escape zone and move the large trawler (or whatever boat it is) out of the way. You can smash it against the dock — precision doesn’t matter here, just get it clear.
Reposition your speedboat where the trawler was, facing the right direction for your final dash. With that in place, it’s time to clear paths, set ramps, and prep your movement.
2. Ramp Placement and Building Clearance
You’ll want to use two ramps to get up to the first toolbox. Cutting away part of the railings with a shotgun makes movement smoother. Pull the toolbox slightly closer if needed and clear out any fencing or walls in front of your intended escape route.
For the large building on the left, use a forklift to clear fences and knock out part of the wall. Don’t forget the explosive barrel — shoot it to destroy part of the structure ahead of time.
If you’ve unlocked it, the bomb tool is ideal for quick demolition. Otherwise, pipe bombs or shotgun blasts will suffice. Clear gates and fencing near the second ramp location too — your goal is to make this area seamless to run through.
Save your progress often. There’s a lot that can go wrong during prep, and a quick save will help you bounce back fast.
3. Fine-Tuning the Route – Clean Up, Clear Paths
You’ll be doing a loop, so make sure each segment is tidy:
- Clear fences by the final objective.
- Drop gates and doors entirely — no hopping over mid-run.
- Blast the metal panel of one target into the sea to skip animations.
At this point, most of the prep is done. You’re clearing not just for function but for flow. Even if you could make a jump or force your way through, it’s better to pave smooth paths for guaranteed speed.
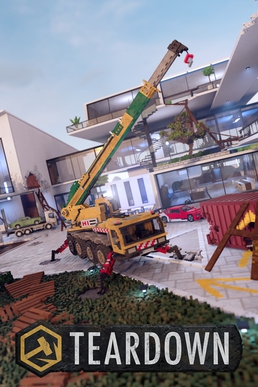
4. Crane Maneuvers and Plank Tactics
Now it gets technical. You’ll need the crane for a few tool recoveries:
- Drive the crane across the bridge and raise it to save time later.
- Attach a plank to the crate holding one of the tools.
- Destroy the small ledge near the crane to allow the crate to drop cleanly.
This process is a bit fiddly. Quick save before doing the pickup. Strong planks help here — weirdly durable — but still, you want a clean pull. Attach the plank to itself to guide the crate gently.
Drag the recovered item near the starting area. You can secure the contents with another plank if needed, but it usually stays put on its own.
5. Bridge Barge Strategy – Tug It Right
Your next major target is across the water. There’s a barge surrounded by scaffolding. Use your tools to break the scaffolding supports. If it’s stubborn, swim under and cut the bases.
Don’t forget to free the boat tethered nearby. You’ll use it as a tug. Plank it to the barge and nudge it near the bridge. Go slow — bad angles will break your connection.
Once it’s in position, use the crane again to hoist the crate off the barge. Be cautious: drag too fast and you’ll destroy the crate or drop the item. Keep your vertical lift smooth and central.
6. Final Vehicle Placement and Escape Prep
Place a car in the central position to run tools to the getaway. Line it up close to the last objective for quick entry.
You can get creative here:
- Use planks to support a smoother entry/exit.
- Position vehicles to cut seconds off.
- Replace final crate lids ahead of time or leave them dangling for fast grabs.
Again, optimization here is totally optional. This guide focuses on a clean run — but better plank routes or smarter vehicle placements can easily trim 10+ seconds.
7. The Final Run – Timing and Flow
Once everything’s in place:
- Grab the first tool near the crane.
- Dash to the next and use your cleaned path.
- Hop into the Jeep, and race to the barn.
- Hit the objective and head straight to the boat.
- Sail to the speedboat and launch for escape.
Even a semi-clean run should leave you with a comfortable buffer. With tighter optimization, you can finish with 10–15 seconds to spare.
Final Thoughts
“Tool Up” is one of those missions where you get out what you put in. Minimal prep equals maximum panic. Thoughtful prep — even if not perfect — makes for one of the smoothest and most rewarding missions in the game.
It’s not about brute force here. It’s about clear visual thinking, tactical placement, and flexibility. The freedom to route your own plan is what makes this mission so enjoyable.
So get creative, give yourself breathing room, and have fun learning how to twist this seemingly chaotic map into a satisfying, well-oiled machine.
Good luck!


Leave a comment